Post by Duck on Nov 30, 2006 16:10:37 GMT -5
This is a tutorial on how to make a ladder work in hl2 sdk:
~Introduction:
In all Source games a ladder in-game consists of the prop or brush that the player perceives as the ladder, and the invisible entity/brush system in front of it that actually makes the ladder climbable. This gives the illusion that the player is climbing the visible ladder, where in fact he is scaling the invisible ladder entity/brush just in front of it.
~Ladder Props/Brushes
To create the visible ladder, you can either create a prop_static with a ladder model (like models/props_c17\metalladder001.mdl) or create a brush-based ladder using a simple brush textured with a ladder texture (like metal/metalladder001a).
~Climbing System
How the ladder's climbing system is created depends on which Source game it is intended for. Ladders in Half-Life 2 and Half-Life 2: Deathmatch are created a little differently than those of earlier games to provide better control for the level designer and player alike, while ladders in Counter-Strike: Source and Day of Defeat: Source are implemented pretty much the same way as the older games.
~~Here is how to create a ladder for Half-Life2/DM~~
~To create a ladder you must define the volume in which the player will move through space while on the ladder. This volume can be defined in two ways: Using the func_useableladder entity, or using the deprecated func_ladderendpoint entity
~The func_useableladder entity can be divided into two sub entities: a starting point and an ending point (See Fig. 1a). Their positions can be typed into the keyvalue fields, or more typically the ladder volume can be defined using the visual ladder tool, by dragging its center circle that is visible when the entity is selected (See Fig. 1b). Using this tool you can drag the start and end point of the ladder into appropriate positions in the 2D view. The ladder's start and ending point may be of arbitrary orientation and length (See Fig. 1c). Simply pull the endpoints where you want them and the player will move between these points while on the ladder.
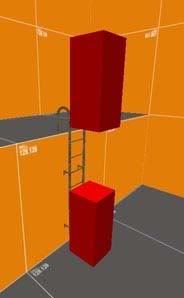
Fig. 1a
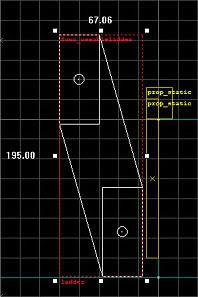
Fig. 1b
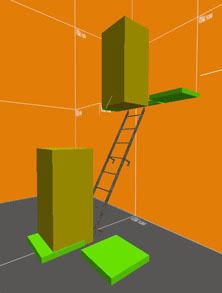
Fig. 1c
~As you place the endpoints, make sure that you place them a couple of units away from the visible ladder brush (or any other brush or model) because if any four sides of the ladder volume is even touching against a surface of a brush or a model, this will make that part of the ladder volume unclimbable.
~The now obsolete func_ladderendpoint entity just consists of a single endpoint. A ladder volume is created by linking two func_ladderendpoints together using their properties. A ladder volume is created between two func_ladderendpoints by naming one of the endpoints and having the other endpoint point to its name in its Other value. (It is not necessary for the second endpoint to point back at the first as stated in properties.)
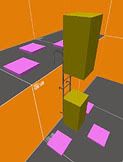
Fig. 2-dismounts
Along with the volume of movement, you can also provide dismount points for the ladder (See Fig. 2) to allow easier and more controlled dismounts. These points are marked using the info_ladder_dismount entity. While next to and facing one of these markers, the player can press his use key to dismount to the position of the marker (typically when ladders run between more than two floors). If he has reached one of the ends of the ladder, he can also simply walk off the ladder by facing one of the markers nearby and walking forward. You can use multiple info_ladder_dismount markers for each dismount place to provide more directions to exit the ladder in.
To avoid possible confusion between nearby ladders using different dismount markers, each info_ladder_dismount entity has a property value called LadderName which can be used to contain the name of the ladder it belongs to.
Like the ladder volume, the dismount points must be free of obstruction and allow the player to stand at their position without intersecting solid world geometry.
~~In Game Testing~~
~Once you have created your ladders, you can compile your map and test them. If you wish, you can also display the ladder entities in-game along with some debug information by opening the console and typing sv_showladders 1 to enable this, and then load or reload (by typing restart) the map you wish to view. This will show you all the start and end points of the ladders (func_useableladder and func_ladderendpoint entities), as well as the dismount points (info_ladder_dismount entities) (See Fig. 3a), and can help you determine if these entities are set up properly, if ladder entities are colliding with solid world geometry or the prop model of the ladder itself (See Fig. 3b), and which func_ladderendpoint entities connect to eachother.
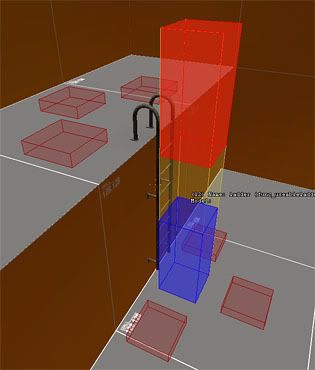
Fig. 3a
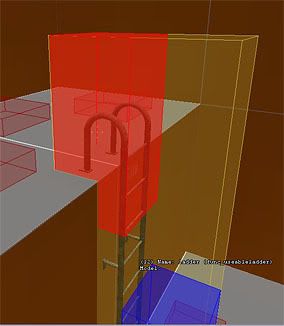
Fig. 3b
~~How ladders work in game~~
~The safest way to mount a ladder in Half-life 2 is to approach its invisible ladder volume and within reaching distance press the use key. This will automatically position you on the ladder. (You can also walk into the ladder volume, with greater risc of missing it and falling down any hole.)
To dismount a ladder you can always either jump off, or press your use key. If the ladder has info_ladder_dismounts, you can also simply walk off from its endpoints, and pressing your use key while next to and facing an info_ladder_dismount will also allow more controlled dismounts anywhere on the ladder.
This is a tutorial on how to create a ladder in hl2, as you can see, it is more complex than creating a simple ladder in counter-strike source, or day of defeat source.~to learn about making ladders in cs:s and dod:s see tutorial in the cs:s general thread forum post
~Introduction:
In all Source games a ladder in-game consists of the prop or brush that the player perceives as the ladder, and the invisible entity/brush system in front of it that actually makes the ladder climbable. This gives the illusion that the player is climbing the visible ladder, where in fact he is scaling the invisible ladder entity/brush just in front of it.
~Ladder Props/Brushes
To create the visible ladder, you can either create a prop_static with a ladder model (like models/props_c17\metalladder001.mdl) or create a brush-based ladder using a simple brush textured with a ladder texture (like metal/metalladder001a).
~Climbing System
How the ladder's climbing system is created depends on which Source game it is intended for. Ladders in Half-Life 2 and Half-Life 2: Deathmatch are created a little differently than those of earlier games to provide better control for the level designer and player alike, while ladders in Counter-Strike: Source and Day of Defeat: Source are implemented pretty much the same way as the older games.
~~Here is how to create a ladder for Half-Life2/DM~~
~To create a ladder you must define the volume in which the player will move through space while on the ladder. This volume can be defined in two ways: Using the func_useableladder entity, or using the deprecated func_ladderendpoint entity
~The func_useableladder entity can be divided into two sub entities: a starting point and an ending point (See Fig. 1a). Their positions can be typed into the keyvalue fields, or more typically the ladder volume can be defined using the visual ladder tool, by dragging its center circle that is visible when the entity is selected (See Fig. 1b). Using this tool you can drag the start and end point of the ladder into appropriate positions in the 2D view. The ladder's start and ending point may be of arbitrary orientation and length (See Fig. 1c). Simply pull the endpoints where you want them and the player will move between these points while on the ladder.

Fig. 1a

Fig. 1b

Fig. 1c
~As you place the endpoints, make sure that you place them a couple of units away from the visible ladder brush (or any other brush or model) because if any four sides of the ladder volume is even touching against a surface of a brush or a model, this will make that part of the ladder volume unclimbable.
~The now obsolete func_ladderendpoint entity just consists of a single endpoint. A ladder volume is created by linking two func_ladderendpoints together using their properties. A ladder volume is created between two func_ladderendpoints by naming one of the endpoints and having the other endpoint point to its name in its Other value. (It is not necessary for the second endpoint to point back at the first as stated in properties.)

Fig. 2-dismounts
Along with the volume of movement, you can also provide dismount points for the ladder (See Fig. 2) to allow easier and more controlled dismounts. These points are marked using the info_ladder_dismount entity. While next to and facing one of these markers, the player can press his use key to dismount to the position of the marker (typically when ladders run between more than two floors). If he has reached one of the ends of the ladder, he can also simply walk off the ladder by facing one of the markers nearby and walking forward. You can use multiple info_ladder_dismount markers for each dismount place to provide more directions to exit the ladder in.
To avoid possible confusion between nearby ladders using different dismount markers, each info_ladder_dismount entity has a property value called LadderName which can be used to contain the name of the ladder it belongs to.
Like the ladder volume, the dismount points must be free of obstruction and allow the player to stand at their position without intersecting solid world geometry.
~~In Game Testing~~
~Once you have created your ladders, you can compile your map and test them. If you wish, you can also display the ladder entities in-game along with some debug information by opening the console and typing sv_showladders 1 to enable this, and then load or reload (by typing restart) the map you wish to view. This will show you all the start and end points of the ladders (func_useableladder and func_ladderendpoint entities), as well as the dismount points (info_ladder_dismount entities) (See Fig. 3a), and can help you determine if these entities are set up properly, if ladder entities are colliding with solid world geometry or the prop model of the ladder itself (See Fig. 3b), and which func_ladderendpoint entities connect to eachother.

Fig. 3a

Fig. 3b
~~How ladders work in game~~
~The safest way to mount a ladder in Half-life 2 is to approach its invisible ladder volume and within reaching distance press the use key. This will automatically position you on the ladder. (You can also walk into the ladder volume, with greater risc of missing it and falling down any hole.)
To dismount a ladder you can always either jump off, or press your use key. If the ladder has info_ladder_dismounts, you can also simply walk off from its endpoints, and pressing your use key while next to and facing an info_ladder_dismount will also allow more controlled dismounts anywhere on the ladder.
This is a tutorial on how to create a ladder in hl2, as you can see, it is more complex than creating a simple ladder in counter-strike source, or day of defeat source.~to learn about making ladders in cs:s and dod:s see tutorial in the cs:s general thread forum post


